📃 Long read
How to Start Threat Modelling in AWS
Introduction
It is hard to find a company that does not use cloud technologies. Therefore security of the implemented cloud solutions is often one of the top priorities. Due to this, it is required to identify and mitigate risks as early as possible. That is where threat modelling comes into play. Threat modelling is a proactive approach to identifying potential security risks, enabling you to address vulnerabilities before they become breaches. In this article we will talk about the fundamentals of threat modelling and discuss the main steps to get started with this practice in AWS.
What is Threat Modelling?
Threat modelling is a structured process for identifying, evaluating security threats to a system and defining appropriate mitigations measures that should be implemented in order to reduce a risk of exploitation. By understanding potential attack vectors, vulnerabilities, and value of assets in scope, organizations can build stronger defenses and make informed decisions about risk management.

The key goals of threat modelling are:
- Identifying critical assets
- Assessing threats and vulnerabilities
- Prioritizing risks based on potential impact
- Implementing effective mitigation measures
When applied in the AWS cloud environment, threat modelling takes into account unique considerations such as shared responsibility, the dynamic nature of cloud resources, and the diverse services AWS offers. It helps you to have a look at your cloud infrastructure from the security point of view and try to understand where you can apply additional protection measures that would match your expectations in terms of security and help to become resistant against common cloud security risks.
How Threat Modelling Can Help Secure AWS Infrastructure?
Threat modelling is particularly effective in cloud environments like AWS because:
- Evolving Attack Surfaces: In cloud environments, threat modelling helps identify and secure critical entry points as new resources and configurations are introduced.
- Complex Architectures: Identifies risks in complex systems involving multiple AWS services.
- Compliance: Aligns with frameworks like AWS Well-Architected Framework and security best practices.
- Cost Efficiency: Preventative measures are often more cost-effective than addressing breaches after they occur.
By applying threat modelling, organizations gain a deeper understanding of their AWS environment, enabling targeted security enhancements.
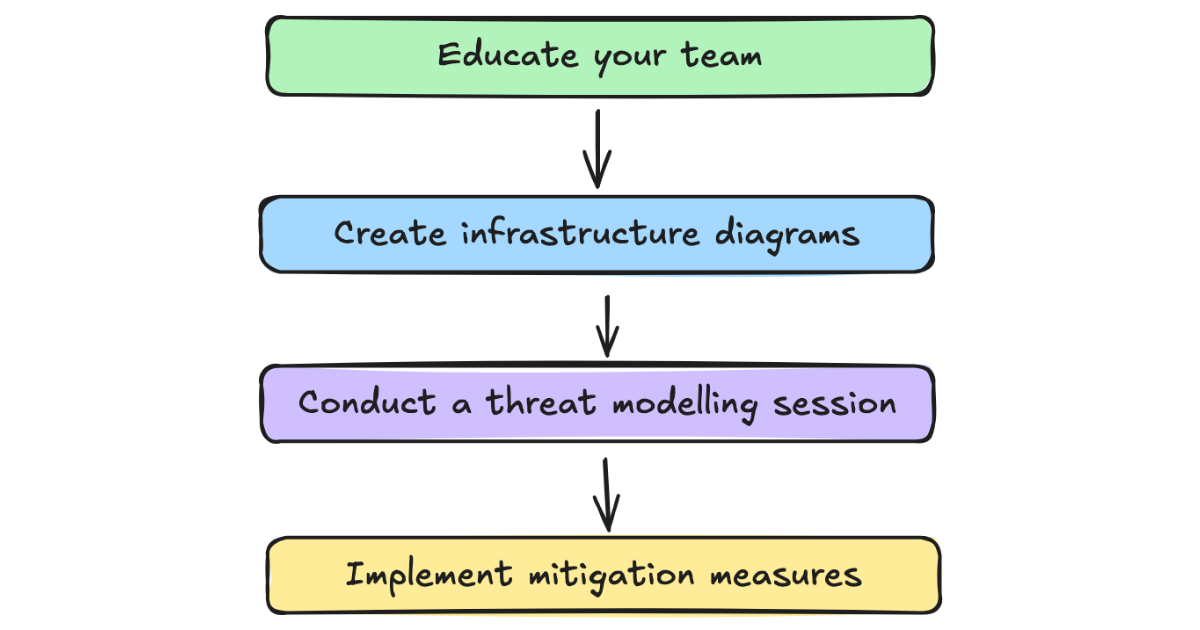
Step 1: Educate Your Team
In order to start doing threat modelling on the project it is required to have a certain set of skills that will help to make this process a way more efficient and achieve measurable results in a shorter amount of time. For instance, participants of threat modelling sessions should have an understanding of common threats to cloud infrastructure, so they will be able to apply them to the resources in scope in the right way, reducing the risk of adding false positives or concentrating your attention on less important assets. Thankfully, there are a lot of training opportunities that will help you to cover this knowledge gap and establish a good foundation in order to move forward to applying these skills in practice. Below is a list of resources that you can use during this journey:
- AWS-Specific Security Training and Resources:
- Threat Modelling for Builders Workshop on AWS SkillBuilder - This workshop introduces you to some of the basics of threat modeling and why to do it, as well as some of the tools and techniques for modeling systems, identifying threats, and selecting mitigations. This training course contains exercises and each exercise has step-by-step instructions as you progress through the workshop.
- Hacking the Cloud: AWS - A resource that contains a description of common attacks on AWS environments with a detailed coverage of steps that malicious actors should take to find and exploit a certain vulnerability. It helps to better understand the potential attack vectors and use this knowledge to create a list of potential threats to your infrastructure.
- How to approach threat modelling - This session teaches you how to improve the security posture of your workloads and reduce the cost of mitigation by effectively integrating threat modelling into your organisation. In this session presenters share tips on how to achieve this whilst driving security ownership and speed to market.
- Threat Modelling Resources:
- Microsoft Threat Modelling Security Fundamentals – This learning path takes you through the four main phases of threat modeling, explains the differences between each data-flow diagram element, walks you through the threat modeling framework, recommends different tools and gives you a step-by-step guide on creating proper data-flow diagrams.
- OWASP Threat Modelling Cheat Sheet – A comprehensive resource that covers different guides (both created by OWASP and other vendors), tools and practical examples on how to implement effective threat modelling practices in your organization.
Investing in your team’s education ensures they can identify threats effectively and propose actionable mitigations.
Step 2: Create Infrastructure Diagrams
Creating detailed infrastructure diagrams is a highly important step that has a significant impact on the efficiency of the threat modelling process. These diagrams serve as a blueprint of your AWS environment, helping your team visualize the architecture, identify critical assets, and pinpoint potential vulnerabilities. A well-designed diagram provides the foundation for analyzing threats and planning effective mitigations.
Infrastructure diagrams help:
- Understand Your Architecture: They offer a clear picture of how components interact, data flows, and dependencies.
- Identify Weak Points: Highlighting exposed areas or insecure configurations becomes easier when you have a visual representation.
- Facilitate Communication: They act as a common reference point for discussions among teams (DevOps, Security, and Operations).
- Meet Compliance Requirements: Visual documentation is often a requirement for audits and compliance frameworks.
Best Practices for Creating Infrastructure Diagrams
To ensure your diagrams are useful and accurate it is recommended to follow some common best practices that help to create well-designed infrastructure diagrams with a required amount of details covered. Such diagrams can help all the participants of threat modelling sessions to quickly highlight main data flows as well as key infrastructure components. Here are some key things to remember when creating infrastructure diagrams:
- Keep Them Updated: AWS environments are dynamic. Regular updates ensure diagrams reflect the current state.
- Focus on Critical Components: Identify key assets (e.g., S3 buckets, databases) and the pathways data flows through.
- Highlight Security Boundaries: Show trust boundaries, where control or access changes, like between VPCs, security groups, or user roles.
- Use Consistent Symbols: AWS provides official architecture icons that make diagrams intuitive and professional. use them in order to make the further threat modelling as efficient as possible.
Key Components to Include in Your Diagrams
When creating diagrams for AWS infrastructure, be sure to represent:
- Compute Resources: EC2 instances, ECS clusters, Lambda functions.
- Storage Services: S3 buckets, EBS volumes, RDS instances.
- Networking: VPCs, subnets, route tables, NAT gateways, internet gateways.
- Security: IAM roles, security groups, Network ACLs.
- Data Flow: Include arrows to show the flow of data between components.
- External Services: Third-party integrations or external APIs.
Here is a sample diagram to give you a better understanding on what to expect:
More examples can be accessed by the following links:
Tools for Creating Infrastructure Diagrams
Several tools can help you create effective and visually appealing diagrams:
| Name | Description |
|---|---|
| Draw.io (diagrams.net) |
Features: Free, browser-based, integrates with Google Drive and GitHub. Advantages: Easy to use, supports AWS-specific icons. Use Case: Suitable for quick and straightforward diagram creation. |
| Lucidchart |
Features: Cloud-based, collaborative, large library of templates. Advantages: Great for team collaboration and sharing. Use Case: Ideal for distributed teams working on complex environments. |
| Cloudcraft |
Features: AWS-specific, visually stunning diagrams, real-time cost estimates. Advantages: Perfect for AWS architects, integrates with live environments for accuracy. Use Case: Best for environments requiring deep AWS service integration visualization. |
| Eraser.io |
Features: Lightweight and straightforward, ideal for quick sketches, AI-powered generation of infrastructure diagrams (Diagram GPT). Advantages: Great choice for brainstorming and iterative diagramming. Use Case: Great for the initial stages of diagram creation, helps to quickly draw a base version of a diagram using AI. |
Steps to Create an Infrastructure Diagram
- Inventory Your Resources:
- Use AWS tools like AWS Resource Groups or AWS Config to get a complete list of your resources.
- Export information from AWS accounts in scope if necessary.
- Define the Scope:
- Decide whether the diagram will cover the entire infrastructure or focus on specific workloads or applications.
- Map Resources and Connections:
- Lay out key AWS services and their interactions. For example, an EC2 instance connected to an RDS database through a VPC.
- Add Security Layers:
- Highlight IAM roles, security group rules, and firewall boundaries. Use color coding or labels for clarity.
- Review and Refine:
- Share the diagram with your team for feedback.
- Ensure it captures all critical elements without being overly cluttered.
Suppose you are designing a threat model for a web application hosted on AWS. Your diagram might include:
- An Elastic Load Balancer distributing traffic to EC2 instances.
- A database layer represented by Amazon RDS.
- Data flow paths between an S3 bucket (for static assets) and the application.
- Security layers like IAM roles, security groups, and a WAF (Web Application Firewall).
Tools like Cloudcraft can import details directly from your AWS account, creating an accurate starting point. By creating comprehensive infrastructure diagrams, you set the stage for effective threat modelling. A clear, detailed diagram ensures all stakeholders have a shared understanding of the architecture, making it easier to identify vulnerabilities and develop mitigation strategies.
Step 3: Conduct a Threat Modelling Session
Once your infrastructure diagrams are ready, the next step is to conduct a threat modelling session. This step involves identifying potential threats to your AWS environment, analyzing their impact, and prioritizing them for mitigation. A well-structured threat modelling session helps uncover vulnerabilities and provides actionable insights for improving security.
The primary objectives of a threat modelling session are:
- Identify Threats: Pinpoint risks based on architecture and configurations.
- Understand Vulnerabilities: Determine how and where threat actors can exploit weaknesses.
- Assess Risk: Prioritize threats by their potential impact and likelihood.
- Define Mitigation Strategies: Propose actionable measures to minimize risks.
Preparing for the Session
Preparation is highly important for a productive threat modelling session. Here’s what you’ll need:
- A Clear Scope:
- Focus on a specific workload, application, or part of your AWS infrastructure.
- Define the boundaries of the session (e.g., a microservice or entire VPC).
- Infrastructure Diagram:
- Use the diagrams created in Step 2 as the foundation for the session.
- Ensure the diagram is up-to-date and includes key components, data flows, and trust boundaries.
- Team Participation: Assemble a cross-functional team including (please note that it is not mandatory to include every role from the listed below, that’s just a reference):
- Cloud Architects: To provide insights into design and dependencies.
- Developers: To explain application behavior and integrations.
- Security Engineers: To assess threats and propose mitigations.
- DevOps Teams: To provide input on deployment and monitoring processes.
- Threat Modelling Frameworks and Tools:
- Select a methodology such as STRIDE or PASTA to guide the session.
- Use tools like OWASP Threat Dragon or AWS Threat Composer for documentation and analysis.
Key Steps of an efficient Threat Modelling Session
- Identify Assets:
- Determine what is most valuable in your architecture. These are your “crown jewels”, such as sensitive data, business-critical applications, or access credentials.
- Identify Threats: Analyze your diagram for potential risks using a framework like STRIDE:
- Spoofing: Can an attacker impersonate a user or service? A good example here is a confused deputy attack.
- Tampering: Can data be altered maliciously in transit or storage? For example, can malicious actor modify objects in an S3 bucket due to misconfigured bucket policies.
- Repudiation: Can users deny their actions due to lack of logging? For instance, lack of proper logging in CloudTrail could make it impossible to trace actions performed by IAM users.
- Information Disclosure: Is sensitive data exposed, for example, due to publicly accessible S3 buckets?
- Denial of Service: Can the system be overwhelmed and made unavailable in a result of DoS or DDoS attack?
- Elevation of Privilege: Can an attacker exploit overly permissive IAM roles to gain administrative access?
-
Analyze Identified Threats: Discuss each identified threat for its potential to exploit vulnerabilities in your AWS environment.
-
Prioritize Risks:
- Use a risk matrix to classify threats based on impact (critical, major, minor) and likelihood (high, medium, low).
- Focus on high-impact, high-likelihood threats first.
- Document Findings:
- Record identified threats, their descriptions, affected components, and proposed mitigations.
- Use tools like AWS Threat Composer to document findings in a structured and AWS-specific way.
Tools for Conducting Threat Modelling
- Features: Open-source, integrates with threat modelling methodologies like STRIDE.
- Advantages: Easy to use, supports visualization and documentation.
- Use Case: Ideal for small to medium AWS deployments.
- Tutorials: Threat Modelling with OWASP Threat Dragon
- Features: Open-source, tailored for AWS-specific architectures, includes predefined threat templates.
- Advantages: Simplifies threat modelling for AWS environments, automates documentation.
- Use Case: Best for large-scale AWS environments with complex configurations.
- Tutorials: AWS re:Inforce 2023 session
Post-Session Actions
- Review Findings:
- Share documented threats and proposed mitigations with stakeholders.
- Prioritize implementation based on available resources and timelines.
- Integrate Threat Modelling into SDLC:
- Make threat modelling one of the initial steps when working on new features and changes to your infrastructure.
- Revisit Threat Models:
- Update the threat model whenever significant architectural changes occur.
Conducting a threat modelling session is a collaborative and iterative process that brings clarity to your AWS security posture. By systematically identifying and prioritizing threats, you can focus your efforts on the most critical risks and strengthen the overall resilience of your cloud environment.
Step 4: Implement Mitigation Measures
After identifying threats, the next step is implementing security measures to mitigate them.
Key Strategies:
- Least Privilege: Restrict IAM roles and policies to limit access, you can use IAM Access Analyzer tool to detect and fix issues with publicly available, unused or overly permissive IAM resources.
- Data Encryption: Use AWS KMS to encrypt data in transit and at rest.
- Secrets Management: Ensure that the application secrets are properly stored with the help of services like AWS Secrets Manager.
- Monitoring and Logging: Leverage AWS CloudTrail, CloudWatch, and GuardDuty for continuous monitoring.
- Network Security: Implement security groups, NACLs, and VPC peering to isolate resources.
Collaborate with your DevOps and security teams to ensure these measures are applied effectively.
Learn by Example
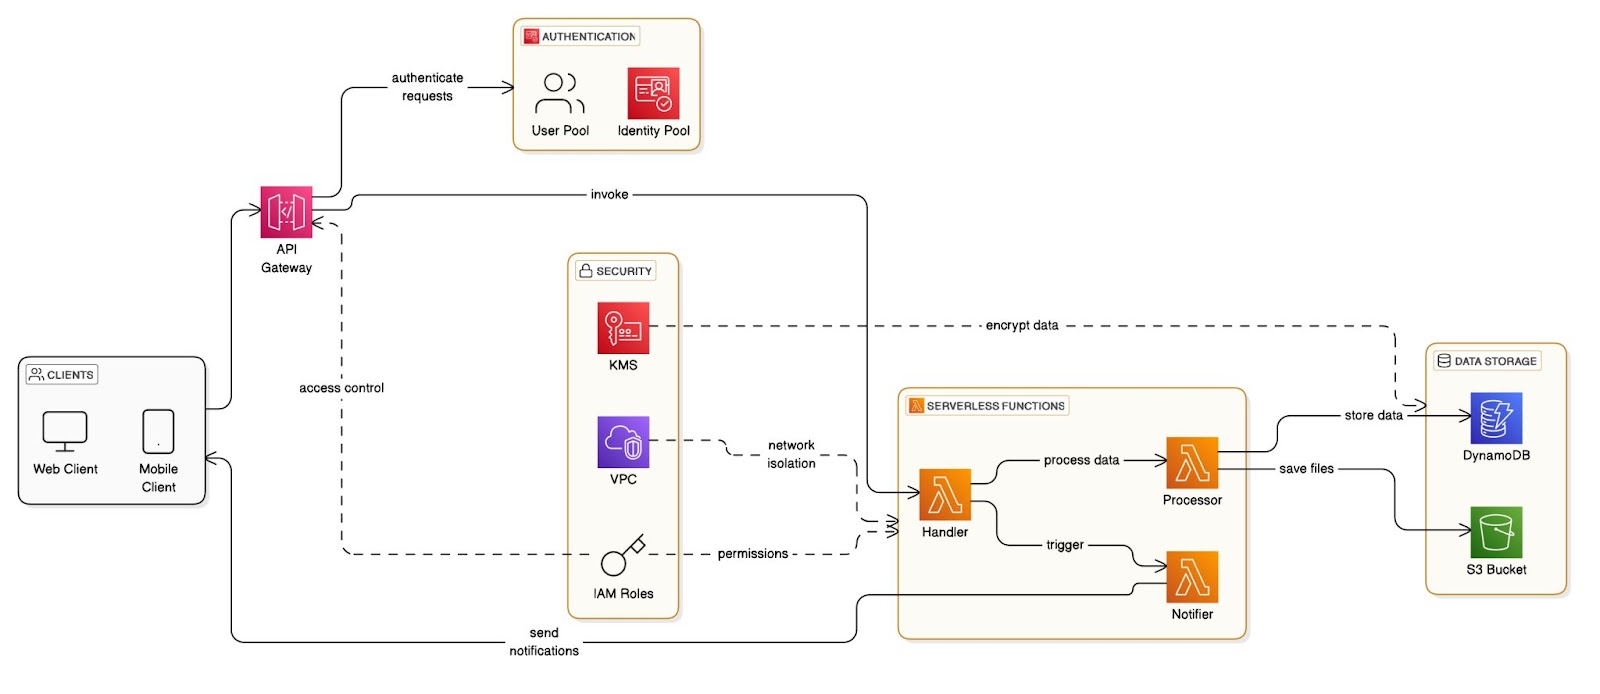
In the previous sections of this article we’ve discussed main steps that should be covered in order to make your threat modelling session efficient. Now, I would like to provide you with a practical example on how to use threat modelling in order to highlight possible security issues in the serverless application architecture. Consider the following architecture:

This architecture represents a serverless application built on AWS, designed to handle user requests via APIs and process, store data using S3 and DynamoDB.
How It All Works Together
- A user sends a request to the API Gateway.
- The API Gateway forwards the request to the Lambda function.
- The Lambda function processes the request:
- It retrieves or modifies user data in a DynamoDB table.
- It interacts with S3 for file-related operations when needed.
- Logs and metrics from the entire workflow are sent to CloudWatch for monitoring.
- Permissions of the lambda function are defined by using the IAM service.
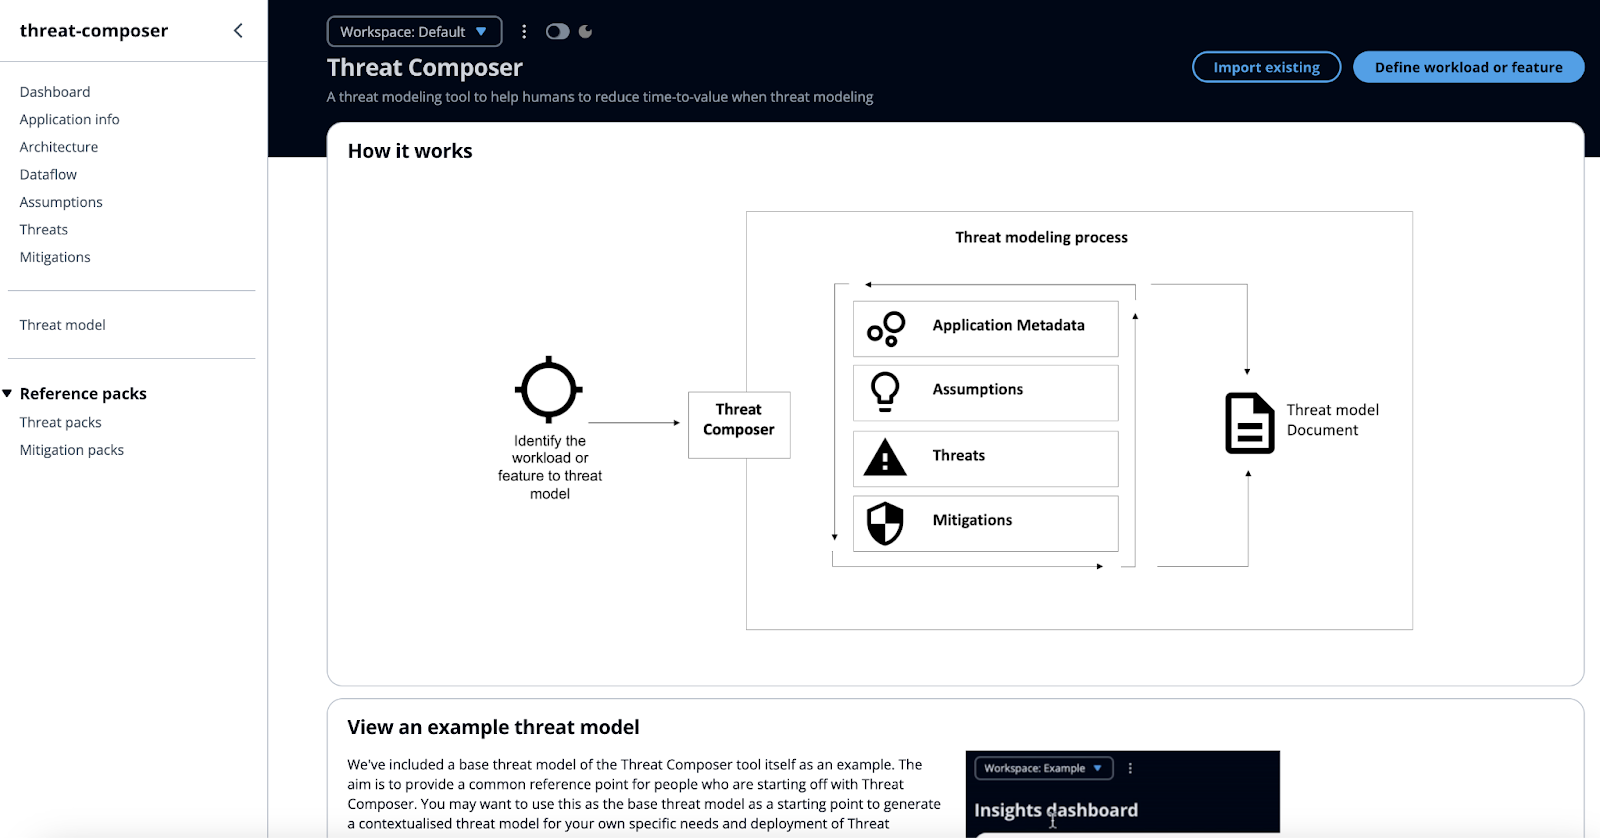
Great, so we added an application architecture diagram and now let’s move to the next step - conduct a threat modelling session. For this example I’m going to use the AWS Threat Composer tool.
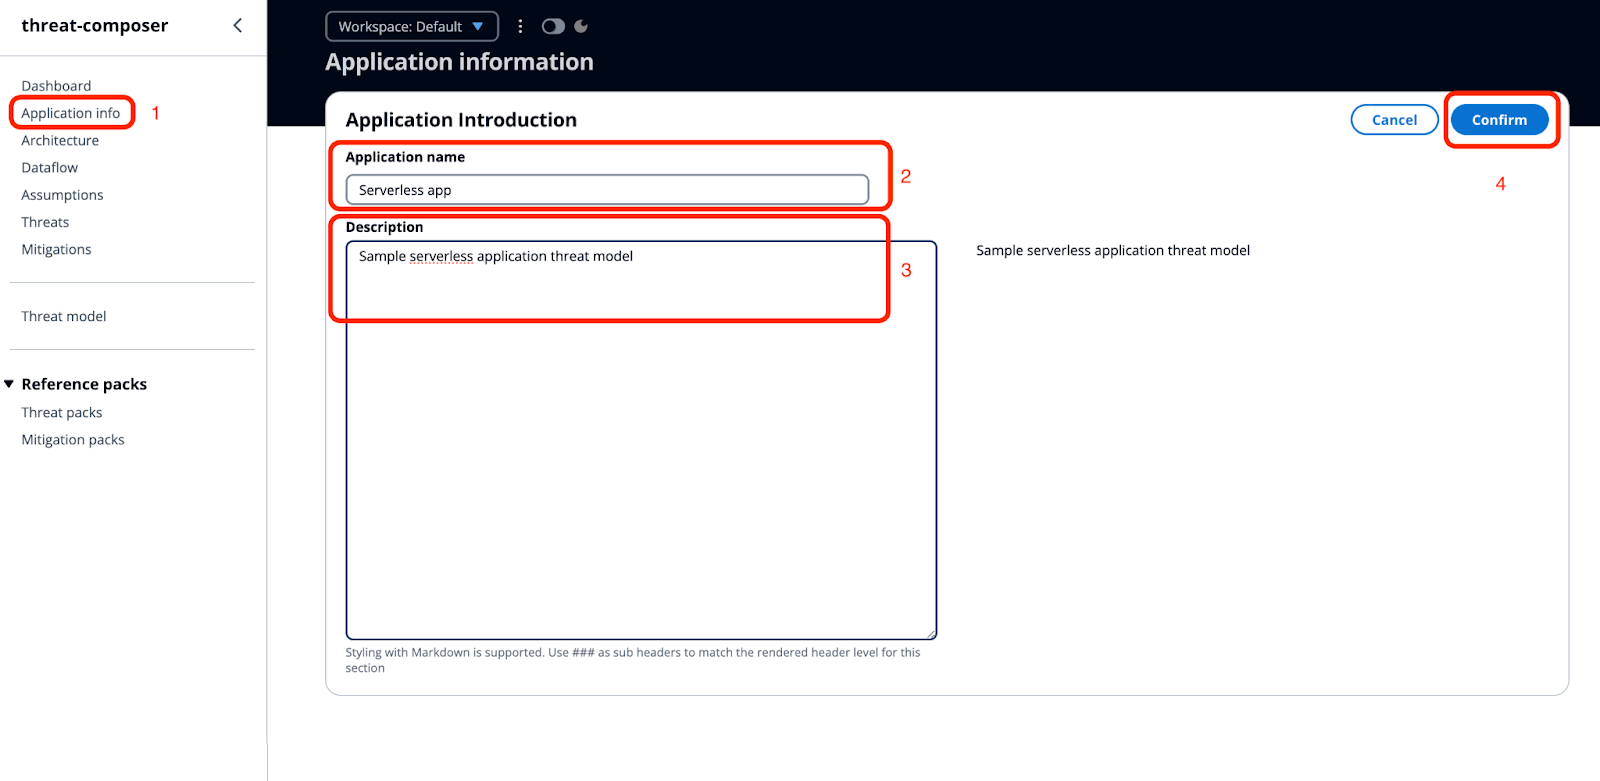
So, open a threat composer application and add a sample application info.
After that, upload your infrastructure diagram to the threat composer.

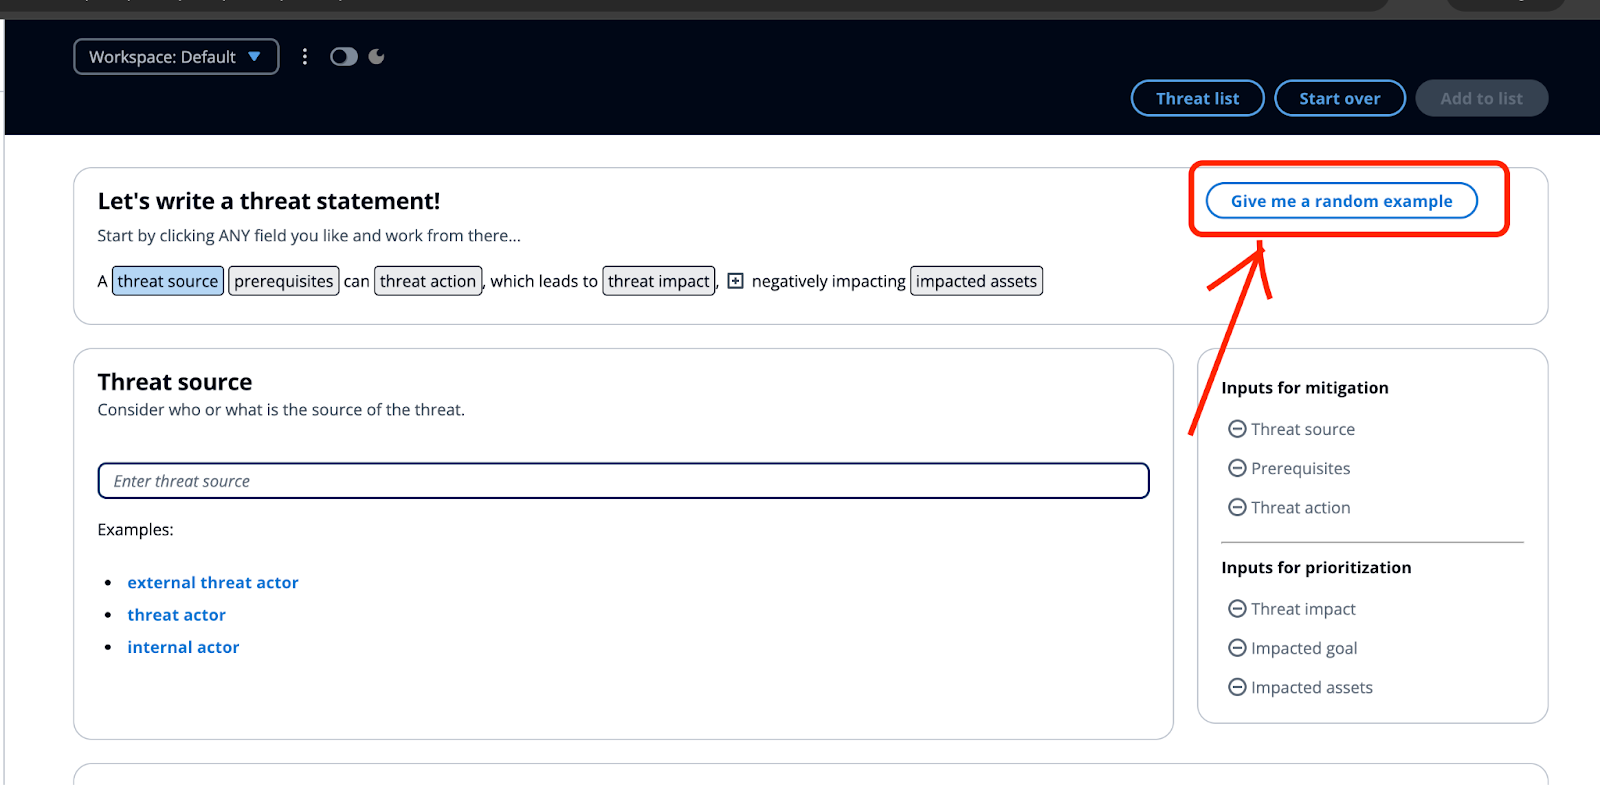
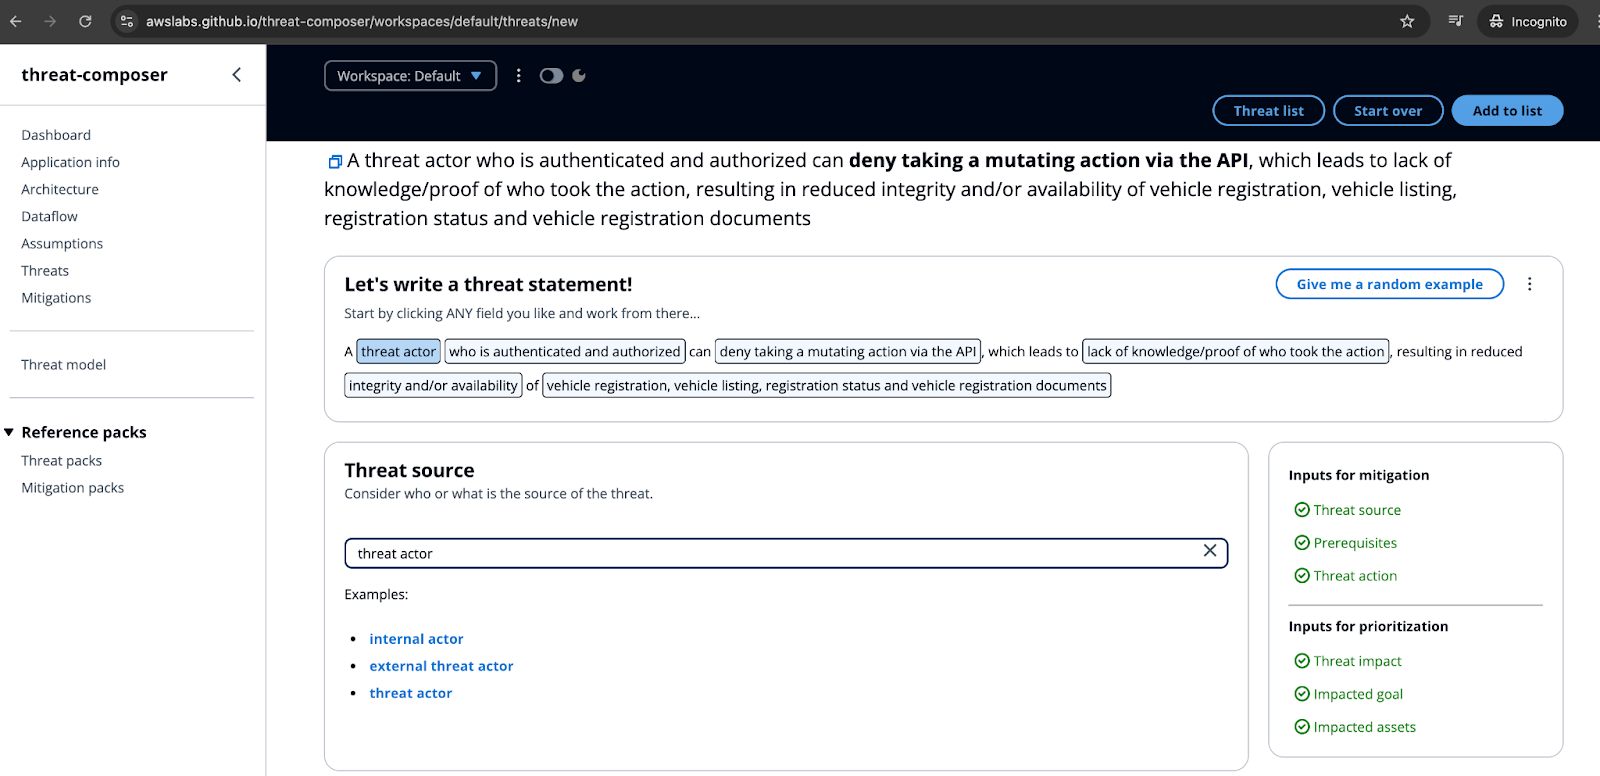
You can also upload a data flow diagram if you have one, so it can be easier to create the threat model itself. Once all the initial steps are done, you can move to the adding actual threat based on your architecture diagram. For this example I will use STRIDE methodology in order to define a list of possible threats. If you are unsure where to start, you can generate a sample threat like below:
Here’s a STRIDE-based threat analysis for the serverless architecture presented on the aforementioned diagram:
- Spoofing
Threat: Unauthorized access to API Gateway or backend services.
- API Gateway might be accessed by attackers impersonating legitimate users if proper authentication mechanisms (e.g., API keys or Lambda authorizers) are not implemented.
- Tampering
Threat: Manipulation of data in transit or at rest.
- API requests could be tampered with if proper input validation is not enforced in Lambda.
- Data stored in DynamoDB or S3 might be modified by unauthorized entities if IAM permissions are too permissive.
- Logs in CloudWatch could be tampered with to hide malicious activities.
- Repudiation
Threat: Lack of accountability for actions performed within the system.
- If CloudWatch logs are not enabled for API Gateway or Lambda, malicious actions may go untracked.
- Lack of detailed logging in DynamoDB or S3 operations could allow users to deny their actions.
- Information Disclosure
Threat: Exposure of sensitive data to unauthorized entities.
- S3 buckets could expose sensitive files if access policies are misconfigured (e.g., public read or write access).
- DynamoDB tables could expose sensitive data if IAM roles or API Gateway routes are misconfigured.
- Logs in CloudWatch may contain sensitive information if proper masking is not applied.
- Denial of Service (DoS)
Threat: System performance degradation or downtime due to overwhelming requests.
- API Gateway could be overwhelmed by a high volume of malicious requests, causing Lambda to hit concurrency limits.
- DynamoDB or S3 could be overwhelmed by excessive read/write requests, leading to throttling or high costs.
- Elevation of Privilege
Threat: Gaining unauthorized access to higher-privileged resources.
- Overly permissive IAM roles for Lambda could allow unauthorized actions, such as accessing unrelated DynamoDB tables or modifying S3 buckets.
- Misconfigured cross-account IAM roles could allow external entities to escalate privileges.
Once you’ve discussed the possible threats, add them to your threat model.
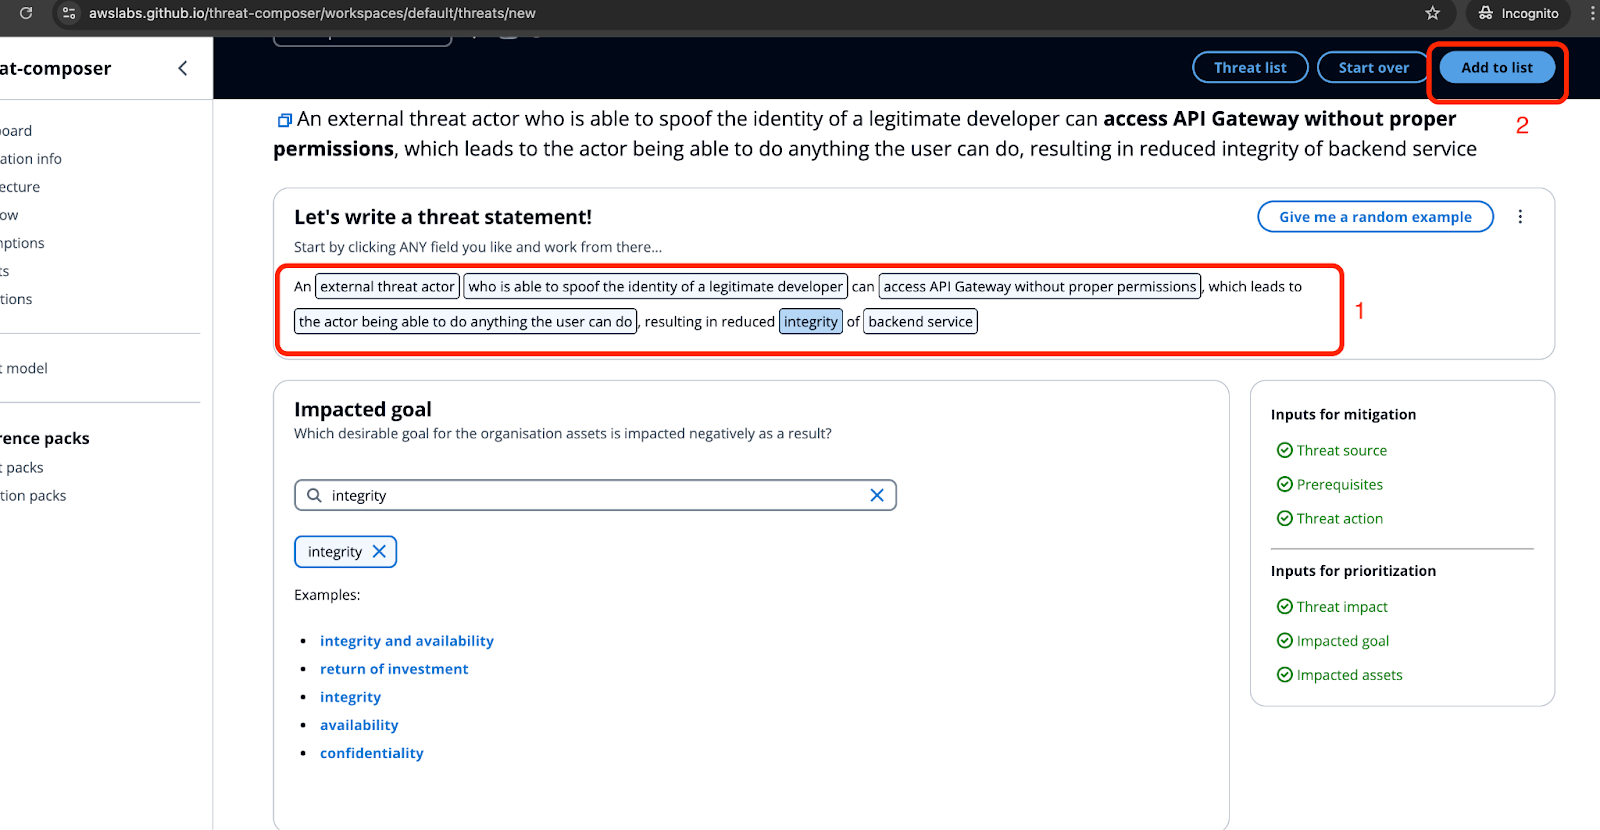
It is also possible to add metadata for each identified threat, so you can make it easier to understand and map threats to the STRIDE categories.
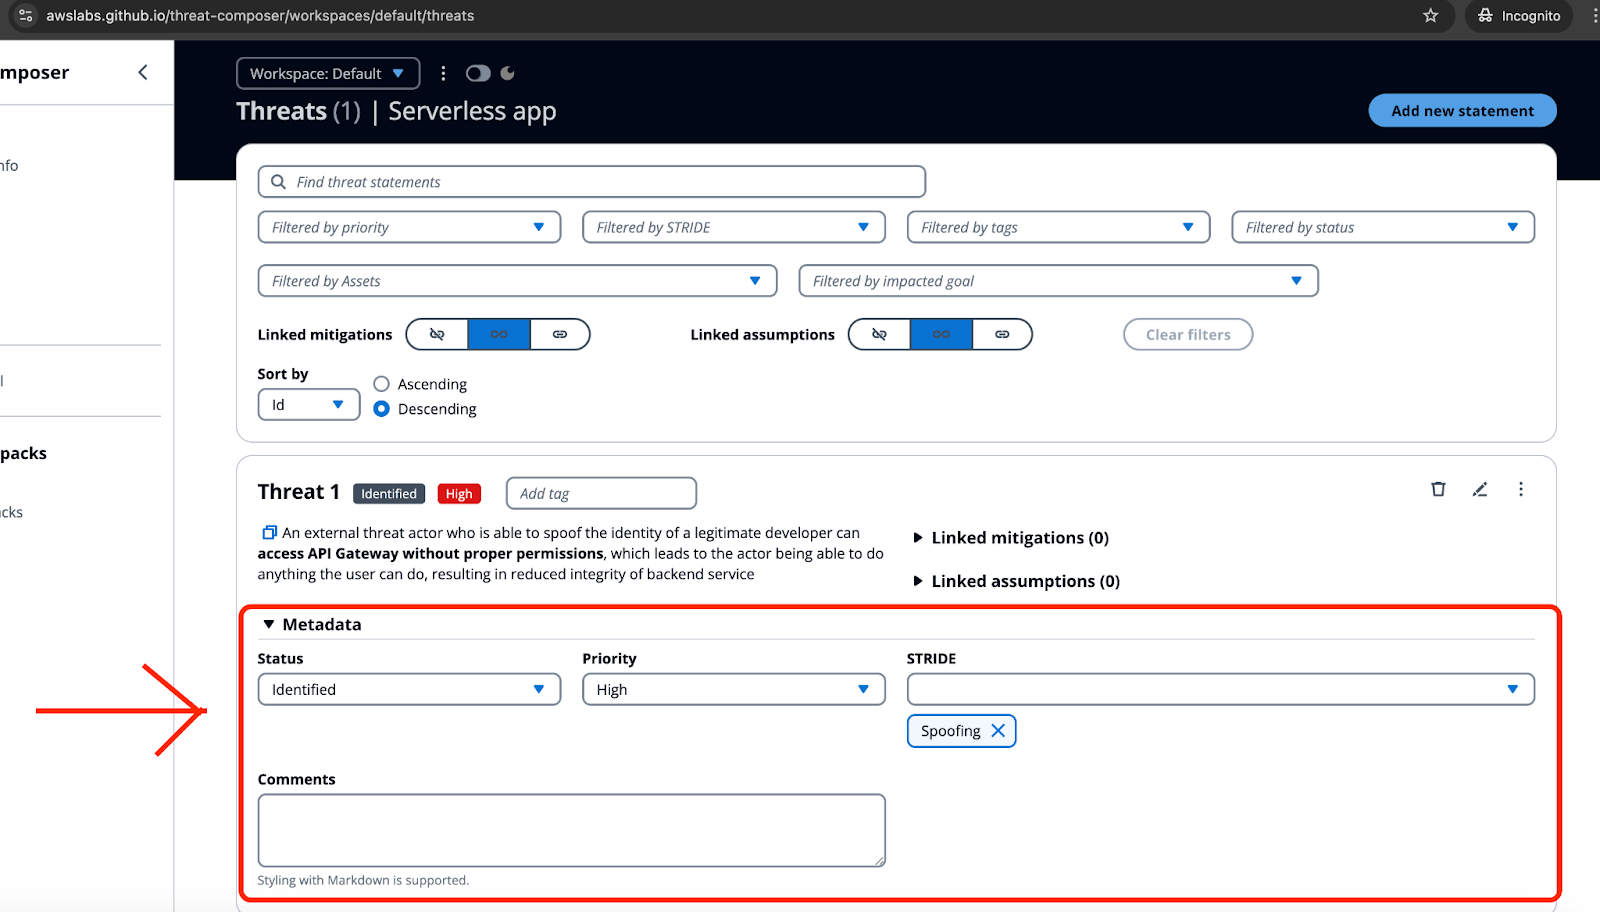
Do the same for all the identified threats. You can review your threat model at any time by visiting the “Threat model” tab inside the tool.
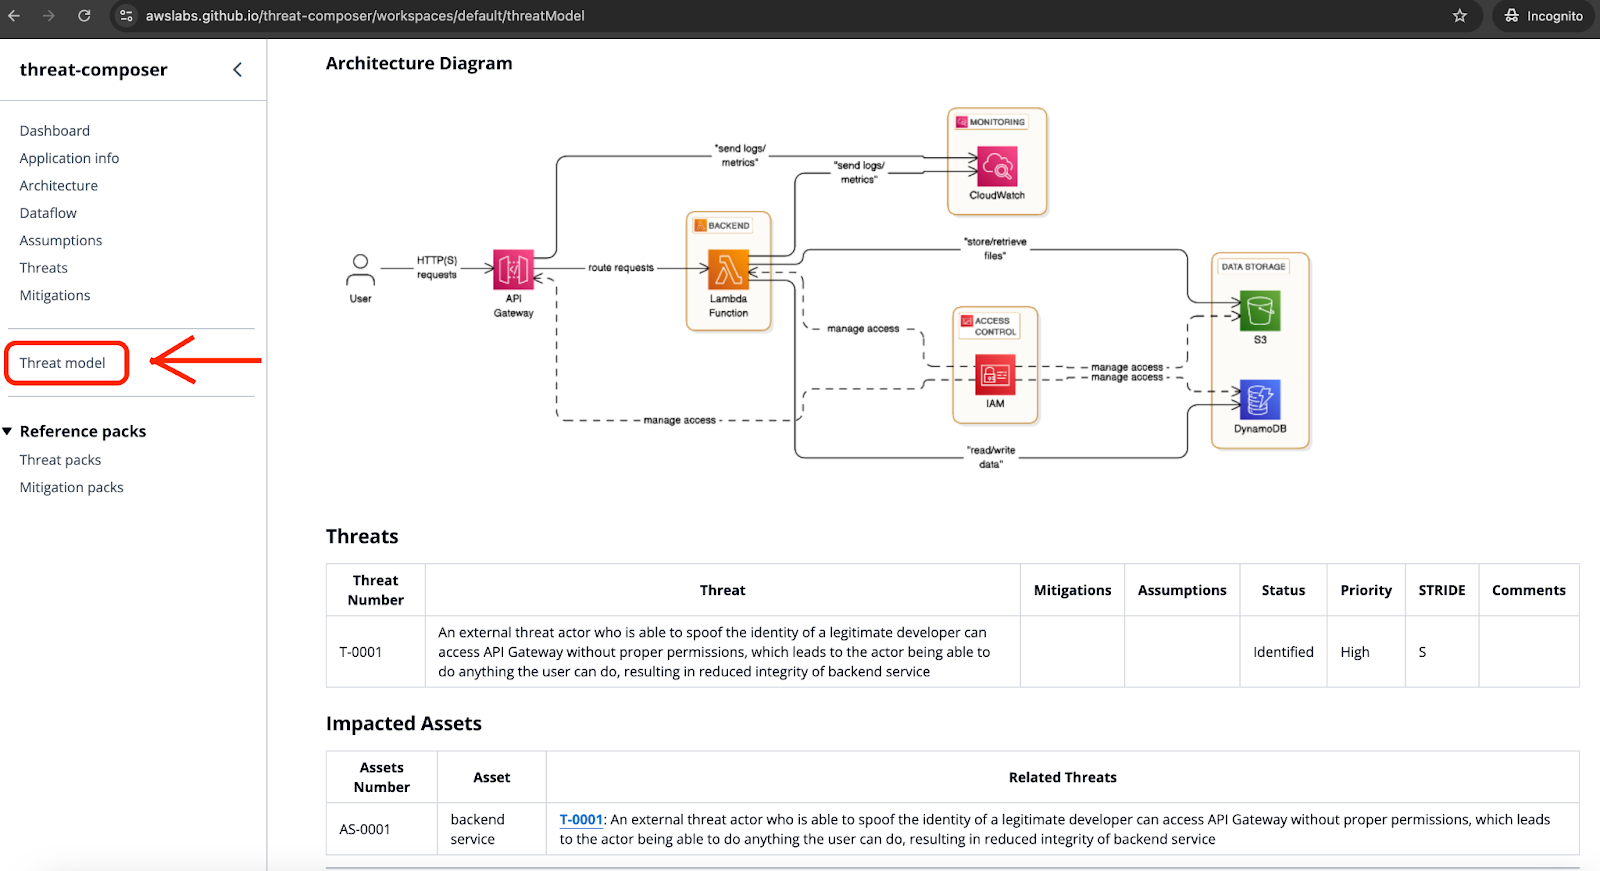
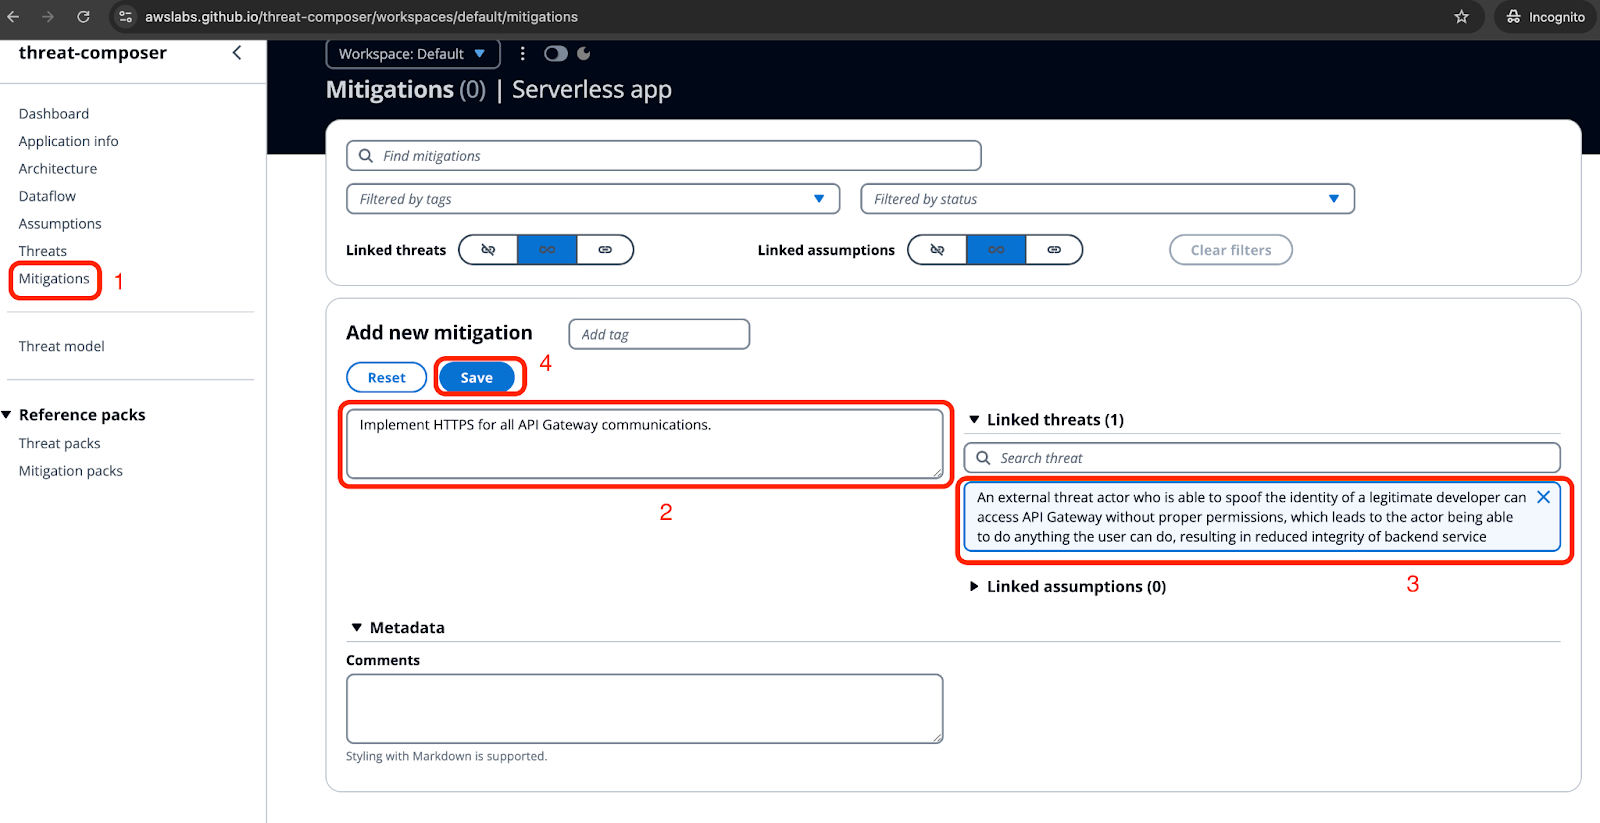
During the threat modelling session we should talk not only about the threats, but also about the mitigations that can help us to reduce security risks. All the mitigations can be linked to the defined threats, so it can be easier to track if everything was covered once you complete work on adding required controls. For the previously defined list of threats we can suggest the following mitigation measures:
Here’s a STRIDE-based threat analysis for the serverless architecture depicted in the diagram:
- Spoofing
Threat: Unauthorized access to API Gateway or backend services.
- API Gateway might be accessed by attackers impersonating legitimate users if proper authentication mechanisms (e.g., API keys or Lambda authorizers) are not implemented.
Mitigation:
- Enforce strong authentication mechanisms for API Gateway (e.g., API keys, JWT-based tokens, or Lambda authorizers).
- Implement HTTPS for all API Gateway communications.
- Tampering
Threat: Manipulation of data in transit or at rest.
- API requests could be tampered with if proper input validation is not enforced in Lambda.
- Data stored in DynamoDB or S3 might be modified by unauthorized entities if IAM permissions are too permissive.
- Logs in CloudWatch could be tampered with to hide malicious activities.
Mitigation:
- Implement input validation and sanitization in Lambda functions.
- Use server-side encryption for S3 and DynamoDB to protect data at rest.
- Restrict IAM policies to allow only authorized services to modify data.
- Enable CloudWatch Logs Integrity validation.
- Repudiation
Threat: Lack of accountability for actions performed within the system.
- If CloudWatch logs are not enabled for API Gateway or Lambda, malicious actions may go untracked.
- Lack of detailed logging in DynamoDB or S3 operations could allow users to deny their actions.
Mitigation:
- Enable detailed CloudWatch logging for API Gateway and Lambda.
- Use AWS CloudTrail to log all API-level interactions with S3 and DynamoDB.
- Implement log retention policies and secure logs against tampering.
- Information Disclosure
Threat: Exposure of sensitive data to unauthorized entities.
- S3 buckets could expose sensitive files if access policies are misconfigured (e.g., public read or write access).
- DynamoDB tables could expose sensitive data if IAM roles or API Gateway routes are misconfigured.
- Logs in CloudWatch may contain sensitive information if proper masking is not applied.
Mitigation:
- Enforce strict S3 bucket policies to restrict access to only authorized IAM roles or users.
- Ensure DynamoDB tables have fine-grained access control based on IAM policies.
- Use API Gateway request and response validation to prevent accidental exposure of sensitive data.
- Mask sensitive data (e.g., PII, API keys) in CloudWatch logs.
- Denial of Service (DoS)
Threat: System performance degradation or downtime due to overwhelming requests.
- API Gateway could be overwhelmed by a high volume of malicious requests, causing Lambda to hit concurrency limits.
- DynamoDB or S3 could be overwhelmed by excessive read/write requests, leading to throttling or high costs.
Mitigation:
- Enable API Gateway rate limiting and throttling to control the number of requests.
- Use AWS WAF to block malicious traffic at API Gateway.
- Monitor and configure DynamoDB and S3 auto-scaling policies to handle peak loads while setting budget limits.
- Elevation of Privilege
Threat: Gaining unauthorized access to higher-privileged resources.
- Overly permissive IAM roles for Lambda could allow unauthorized actions, such as accessing unrelated DynamoDB tables or modifying S3 buckets.
- Misconfigured cross-account IAM roles could allow external entities to escalate privileges.
Mitigation:
- Use IAM policies with the least privilege principle for all roles (e.g., Lambda can access only specific S3 buckets and DynamoDB tables).
- Regularly audit IAM policies using tools like AWS IAM Access Analyzer.
- Implement MFA (Multi-Factor Authentication) for all privileged IAM roles.
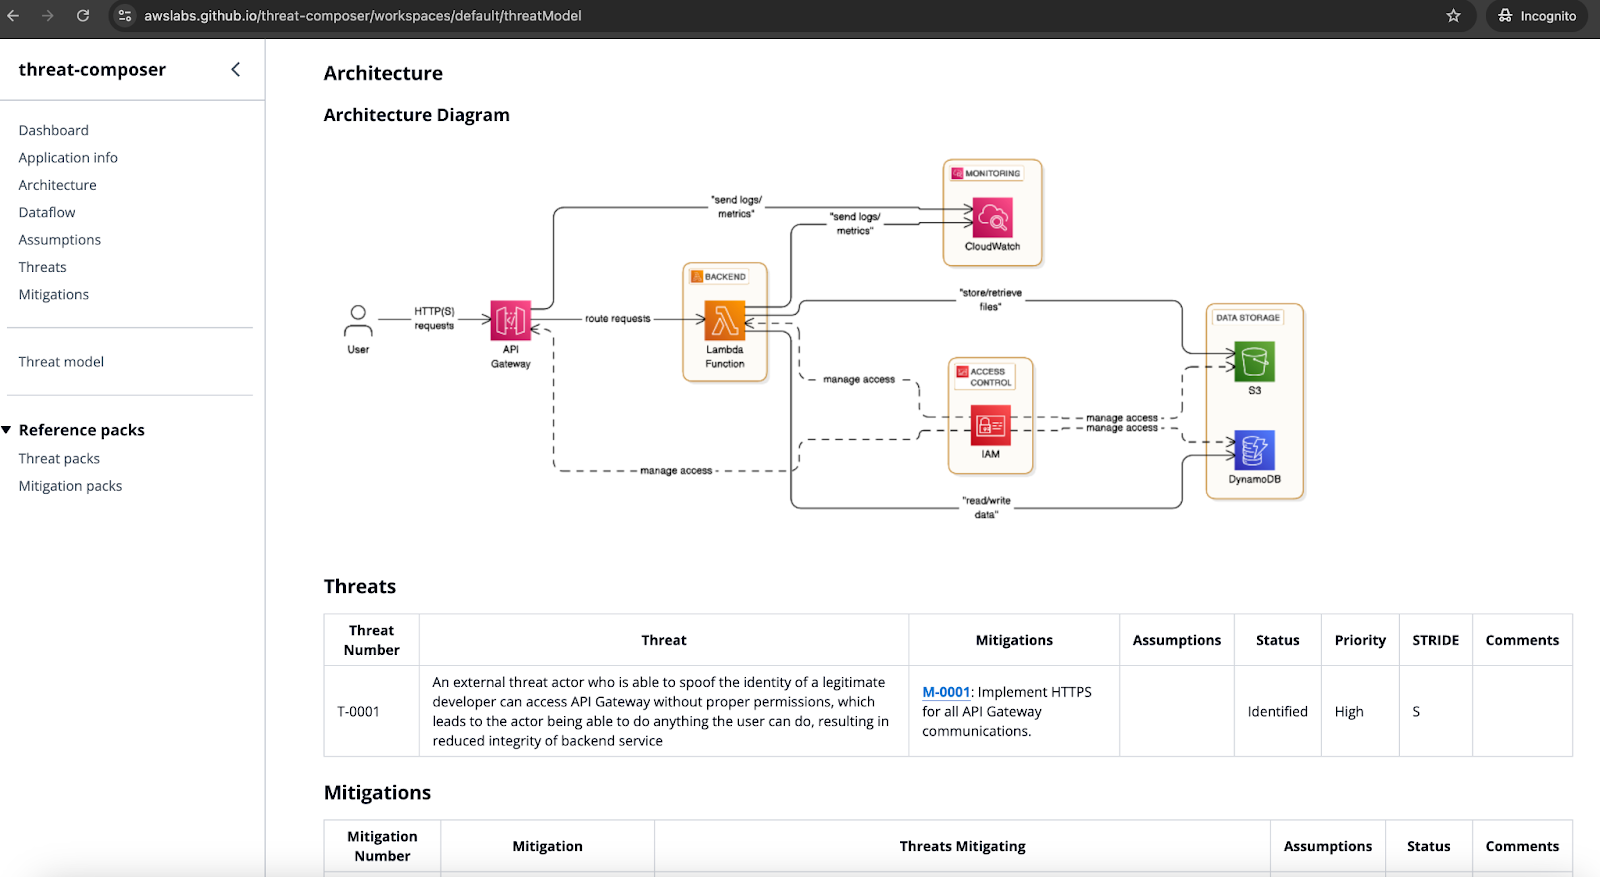
Final threat model will look in the following way:
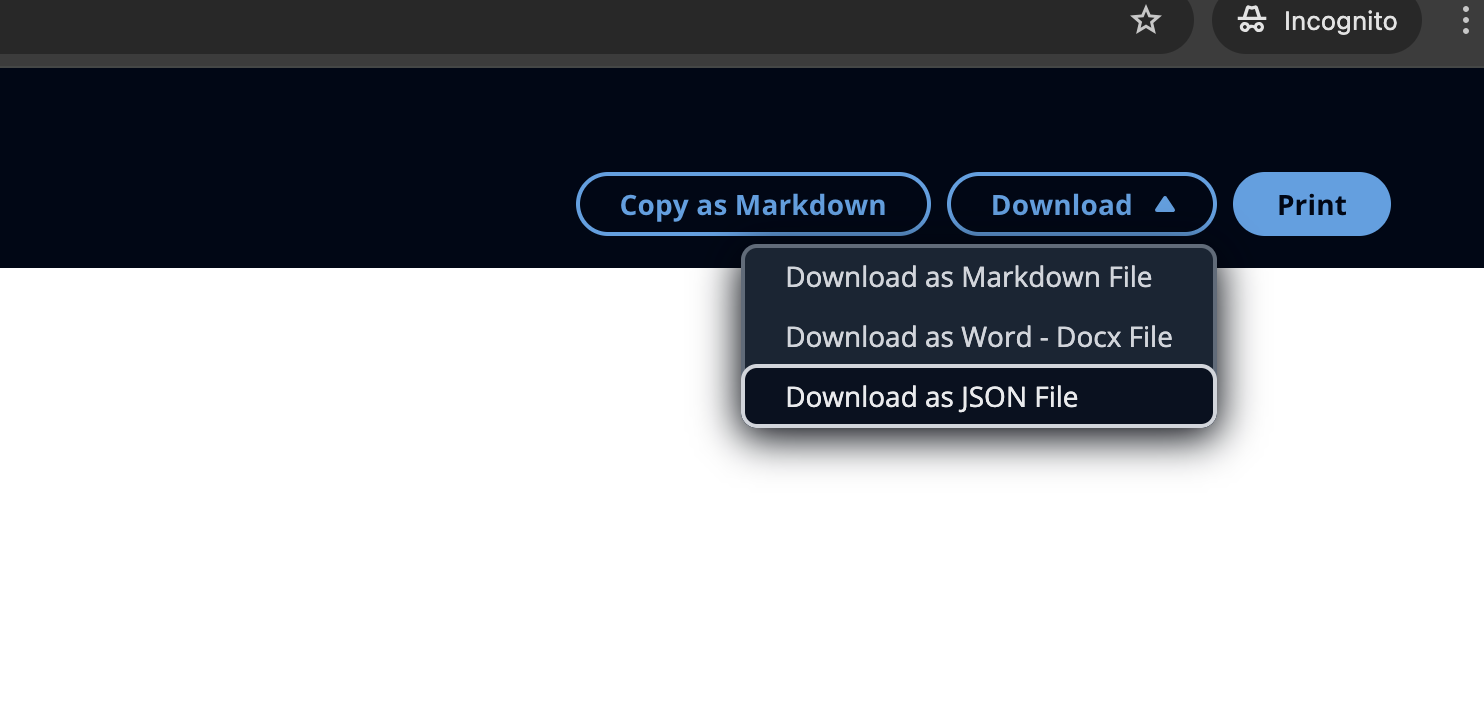
You can additionally export it and save for later in the following formats:
- JSON
- Markdown
- Docx
What’s Next?
Threat modelling is not a one-time task - it’s an ongoing process. As your AWS infrastructure evolves, so should your threat models.
Next Steps:
- Regular Updates: Update your threat models as infrastructure changes occur.
- Automation: Explore tools for automating threat detection and response.
- Continuous Learning: Stay informed about new threats and AWS security updates
By embedding threat modelling into your development lifecycle, you can maintain robust security and confidently navigate the complexities of AWS.
I hope this post will help you to introduce threat modelling to your team and make it a valuable part of your SDLC processes. If you’re interested in receiving more AWS security related content, please follow me on LinkedIn or GitHub.
Enjoying this?
Get a deep read like this, plus every AWS security change, every Monday.